Direct USB Gadget Mode on Raspberry Pi Zero: Soldering + Setup Guide
Want your Raspberry Pi Zero, Zero W, or Zero 2 W to show up as a USB Ethernet device when plugged into a PC? You can do it by soldering a USB-A connector directly to the test points and configuring gadget mode. This turns your Pi into a USB device using USB OTG (On-The-Go) — ideal for serial access, remote networking, and headless setup.
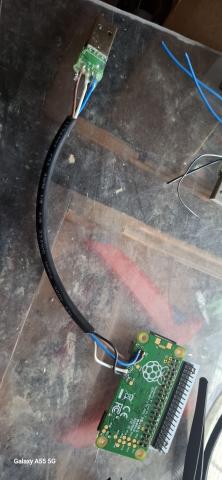
✅ Soldering the USB-A Connector (Gadget Mode)
You'll be connecting the USB-A male plug directly to these test points on the Pi:
| USB Pin | Pi Zero Test Point | Description |
|---|---|---|
| VBUS | PP1 |
5V power IN from USB host |
| GND | PP6 |
Ground |
| D+ | PP23 |
USB data positive |
| D− | PP22 |
USB data negative |
⚠️ These test points connect to the Pi’s USB OTG port — when soldered and configured, the Pi will act as a USB device, not a host.
🔧 Enabling USB Ethernet Gadget Mode
After soldering, you'll need to configure the boot partition of your Pi’s SD card:
1. config.txt
Add this to the bottom of /boot/config.txt:
dtoverlay=dwc22. cmdline.txt
Edit /boot/cmdline.txt and add this after rootwait (must stay on one line):
... rootwait modules-load=dwc2,g_ether ...✅ When Connected to a Host
- The Pi will appear as a USB Ethernet adapter.
- You can assign a static IP or use DHCP.
- Common default Pi IP:
192.168.7.2 - Hostname:
raspberrypi.local(via mDNS)
🛠️ Pro Tips
- Use a short USB-A plug or cannibalized cable — shrink wrap or hot glue for strain relief.
- Great for headless setups — no serial, no micro-USB hub needed.
- You can still use the micro-USB power port for power only if OTG is wired separately.
Triple “5” Farms Tech Division – Fewer cables, more capabilities.